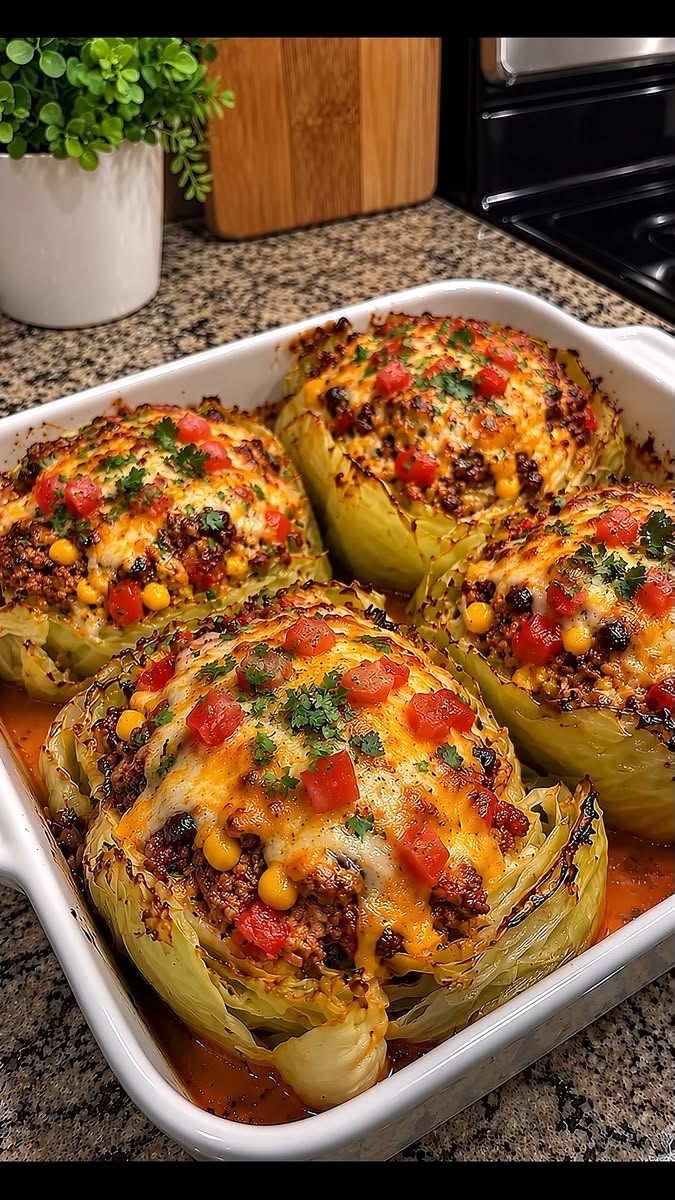
Baked Loaded Stuffed Cabbage Bowls with Melted Cheese
Baked Loaded Stuffed Cabbage Bowls with Melted Cheese are a delicious twist on traditional stuffed cabbage rolls. Tender cabbage leaves are filled with seasoned ground beef, rice, savory tomatoes, and flavorful spices, then topped with melted cheese and baked until bubbling and golden.
This comforting recipe combines the classic flavors of homemade cabbage rolls with the irresistible goodness of a cheesy casserole. Instead of spending time rolling individual cabbage leaves, you can prepare everything in easy-to-serve cabbage bowls for a hearty family dinner.
Whether you’re cooking for a busy weeknight or looking for a cozy weekend meal, these baked stuffed cabbage bowls are simple, satisfying, and full of homemade flavor.
Why You’ll Love These Baked Loaded Stuffed Cabbage Bowls
– Easy to prepare: Enjoy stuffed cabbage flavors without complicated rolling techniques.
– Cheesy and comforting: Melted cheese adds a rich, delicious finishing touch.
– Hearty and satisfying: Ground beef, rice, and cabbage make a filling combination.
– Family-friendly: A comforting baked meal that everyone can customize.
– Perfect for meal prep: Prepare the filling ahead of time and assemble the bowls when needed.
Ingredients You’ll Need
For the Cabbage Bowls
– 1 large green cabbage
– 1 tablespoon olive oil
– Salt and black pepper, to taste
For the Beef and Rice Filling
– 1 pound ground beef
– 1 cup cooked rice
– 1 small onion, finely diced
– 3 cloves garlic, minced
– 1 can (14.5 ounces) diced tomatoes, drained slightly
– 1/2 cup tomato sauce
– 1 tablespoon tomato paste
– 1 teaspoon paprika
– 1 teaspoon Italian seasoning
– 1/2 teaspoon onion powder
– 1/2 teaspoon black pepper
– 1 teaspoon salt, or to taste
– 1 tablespoon Worcestershire sauce, optional
For the Cheesy Topping
– 1 1/2 cups shredded cheddar cheese
– 1/2 cup shredded mozzarella cheese
– 2 tablespoons grated Parmesan cheese, optional
– Fresh parsley for garnish
Step-by-Step Instructions
Step 1: Prepare the Cabbage
Preheat your oven to 375°F (190°C).
Remove any damaged outer cabbage leaves and rinse the cabbage. Cut it into large wedges or thick sections, keeping enough of the base intact to help each piece hold its shape.
Carefully remove some of the inner leaves to create shallow bowls, if desired. Alternatively, use individual cabbage wedges as edible bases for the filling.
Brush the cabbage lightly with olive oil and season with a little salt and black pepper.
Step 2: Soften the Cabbage
Place the cabbage pieces in a baking dish with a small splash of water. Cover with foil and bake for approximately 20–25 minutes, until they begin to soften.
This step helps the cabbage become tender without requiring excessive baking time later.
Remove the dish from the oven and carefully drain any excess liquid.
Step 3: Brown the Ground Beef
While the cabbage bakes, heat a large skillet over medium-high heat.
Add the ground beef and cook for 5–7 minutes, breaking it into small pieces with a wooden spoon. Cook until browned and no longer pink.
Drain excess fat if necessary, then add the diced onion. Cook for 3–4 minutes until softened.
Stir in the minced garlic and cook for another 30 seconds until fragrant.
Step 4: Prepare the Stuffed Cabbage Filling
Add the diced tomatoes, tomato sauce, tomato paste, paprika, Italian seasoning, onion powder, salt, black pepper, and Worcestershire sauce.
Stir everything together and simmer for 5–7 minutes, allowing the flavors to combine and some of the excess liquid to evaporate.
Remove the skillet from the heat and fold in the cooked rice until evenly distributed.
Taste the filling and adjust the seasoning as needed.
Step 5: Fill the Cabbage Bowls
Arrange the softened cabbage pieces in a baking dish.
Spoon the beef and rice mixture into each cabbage bowl or over each cabbage wedge. Press the filling gently into place without crushing the cabbage.
If you have extra filling, distribute it around the cabbage in the baking dish for an even heartier casserole.
Step 6: Add the Cheese
Sprinkle the shredded cheddar and mozzarella evenly over the stuffed cabbage bowls.
Add Parmesan cheese if desired for a deeper, savory flavor.
Make sure each portion receives a generous layer of cheese for a delicious melted topping.
Step 7: Bake Until Bubbly
Cover the baking dish loosely with foil and bake for 15–20 minutes.
Remove the foil and bake for another 10–15 minutes, until the cabbage is tender, the filling is hot, and the cheese is melted and lightly golden.
If you prefer a more browned cheese topping, broil for 1–2 minutes at the end, watching carefully to prevent burning.
Step 8: Garnish and Serve
Remove the dish from the oven and allow it to rest for about 5 minutes.
Sprinkle with fresh parsley and serve the stuffed cabbage bowls warm. Spoon any extra tomato and beef filling from the baking dish over the top.
Tips for the Best Cheesy Stuffed Cabbage Bowls
– Choose a firm cabbage: A large, tightly packed head of green cabbage works best.
– Soften the cabbage first: This helps prevent tough or undercooked leaves.
– Use cooked rice: Fully cooked rice combines easily with the filling and avoids uneven cooking.
– Drain excess fat: Removing extra grease keeps the tomato filling from becoming oily.
– Simmer the filling: Reducing excess liquid helps prevent watery cabbage bowls.
– Use freshly shredded cheese: It often melts more smoothly than pre-shredded varieties.
– Avoid overfilling: Leave room for the cheese and filling to settle without spilling.
– Check the cabbage texture: Baking times vary depending on the thickness of the cabbage pieces.
Easy Recipe Variations
Make It Extra Cheesy
Add cream cheese to the beef filling or mix mozzarella, cheddar, and Monterey Jack for an extra-creamy topping.
Use Ground Turkey
Replace the ground beef with ground turkey or chicken. Season well and cook until the meat reaches 165°F (74°C).
Add Bacon
Cook and crumble 4–6 slices of bacon, then mix some into the filling or sprinkle it over the cheese before baking.
Make It Spicy
Add red pepper flakes, cayenne pepper, or chopped jalapeños to the beef mixture for a spicy kick.
Add More Vegetables
Stir finely diced carrots, mushrooms, zucchini, or bell peppers into the filling while cooking the onions.
Make It Low-Carb
Replace the rice with cauliflower rice. Cook the cauliflower rice briefly before mixing it into the filling, and allow excess moisture to evaporate.
Try Different Cheeses
Mozzarella creates a stretchy topping, cheddar adds sharp flavor, and provolone or Monterey Jack melts beautifully over the cabbage.
What to Serve with Stuffed Cabbage Bowls
These cabbage bowls are filling enough to serve as a complete meal, but a few simple sides can make dinner even better.
– Garlic bread
– Steamed green beans
– Roasted carrots
– A fresh garden salad
– Roasted potatoes
– Buttered rice for extra portions
– Crusty bread for soaking up the tomato sauce
For a balanced dinner, serve one or two cabbage bowls with a crisp salad or roasted vegetables.
How to Store and Reheat Leftovers
Refrigerator
Allow leftovers to cool slightly, then place them in an airtight container. Refrigerate within two hours of cooking and consume within 3–4 days.
Store the cabbage bowls with any extra tomato sauce to help keep the filling moist.
Freezer
Let the stuffed cabbage bowls cool completely, then place them in freezer-safe containers. Freeze for up to 2–3 months for best quality.
Thaw overnight in the refrigerator before reheating. The cabbage may become softer after freezing, but the flavor should remain delicious.
Reheating
Place the cabbage bowls in an oven-safe dish, cover with foil, and heat at 325°F (163°C) until thoroughly hot.
For individual servings, microwave in short intervals until heated evenly. Add a spoonful of tomato sauce or water if the filling seems dry.
Reheat leftovers to 165°F (74°C).
Frequently Asked Questions
Can I Make Stuffed Cabbage Bowls Without Rice?
Yes. You can leave out the rice or replace it with cauliflower rice for a lower-carbohydrate option. You may want to add extra vegetables or a little more ground beef to maintain the filling’s texture.
Do I Need to Boil the Cabbage First?
No. You can soften the cabbage in the oven, as described in this recipe, or blanch the leaves in boiling water for several minutes. The goal is to make the cabbage flexible and tender enough to bake comfortably with the filling.
Can I Prepare These Cabbage Bowls Ahead of Time?
Yes. Prepare the filling and soften the cabbage a day ahead. Store both separately in the refrigerator, then assemble the bowls, add cheese, and bake when you’re ready to serve.
You can also assemble the dish ahead of time and refrigerate it, covered. Allow for additional baking time if it goes into the oven cold.
Why Are My Stuffed Cabbage Bowls Watery?
Cabbage and tomatoes naturally release moisture. Drain excess liquid from the tomatoes, simmer the filling until slightly thickened, and remove any water from the baking dish before assembling the bowls.
Can I Use Red Cabbage Instead of Green Cabbage?
Yes. Red cabbage can work, although it is often firmer and may require extra cooking time. Green cabbage is generally easier to shape into bowls and has a milder flavor.
Which Cheese Is Best for This Recipe?
Cheddar and mozzarella make an excellent combination. Cheddar provides a rich flavor, while mozzarella creates a smooth, stretchy topping. Gruyère or Monterey Jack are also delicious alternatives.
Can I Make This Recipe Vegetarian?
Yes. Replace the ground beef with cooked lentils, chopped mushrooms, or plant-based ground meat. Use vegetable broth or additional tomato sauce if needed, and adjust the seasonings to taste.
Printable Recipe Card
Recipe: Baked Loaded Stuffed Cabbage Bowls with Melted Cheese
Prep Time: 25 minutes
Cook Time: 50–60 minutes
Total Time: Approximately 1 hour 15 minutes to 1 hour 25 minutes
Servings: 4–6
Ingredients
For the Cabbage
– 1 large green cabbage
– 1 tablespoon olive oil
– Salt and black pepper, to taste
For the Filling
– 1 pound ground beef
– 1 cup cooked rice
– 1 small onion, diced
– 3 cloves garlic, minced
– 1 can (14.5 ounces) diced tomatoes, drained slightly
– 1/2 cup tomato sauce
– 1 tablespoon tomato paste
– 1 teaspoon paprika
– 1 teaspoon Italian seasoning
– 1/2 teaspoon onion powder
– 1/2 teaspoon black pepper
– 1 teaspoon salt, or to taste
– 1 tablespoon Worcestershire sauce, optional
For the Topping
– 1 1/2 cups shredded cheddar cheese
– 1/2 cup shredded mozzarella cheese
– 2 tablespoons grated Parmesan, optional
– Fresh parsley, optional
Instructions
1. Preheat the oven to 375°F (190°C).
2. Prepare the cabbage by removing damaged leaves and cutting it into thick wedges or sections suitable for filling.
3. Place the cabbage in a baking dish with a splash of water, cover with foil, and bake for 20–25 minutes until slightly tender. Drain excess liquid.
4. Brown the ground beef in a skillet for 5–7 minutes. Drain excess fat if necessary.
5. Add the onion and cook for 3–4 minutes. Stir in the garlic and cook for 30 seconds.
6. Add the tomatoes, tomato sauce, tomato paste, Worcestershire sauce, and seasonings. Simmer for 5–7 minutes.
7. Fold in the cooked rice and spoon the mixture into or over the softened cabbage.
8. Top with cheddar, mozzarella, and Parmesan if desired.
9. Cover with foil and bake for 15–20 minutes. Uncover and bake for another 10–15 minutes until the cabbage is tender and the cheese is melted.
10. Garnish with parsley, rest for 5 minutes, and serve warm.
Storage: Refrigerate for 3–4 days or freeze for up to 2–3 months for best quality.
Final Thoughts
Baked Loaded Stuffed Cabbage Bowls with Melted Cheese bring together everything people love about traditional stuffed cabbage in an easier, cheesier dish. Tender cabbage, seasoned ground beef, rice, rich tomato sauce, and a bubbling cheese topping make every serving satisfying and full of flavor.
This recipe is easy to customize with different vegetables, cheeses, and seasonings, making it a versatile choice for family dinners and meal prep. Serve it fresh from the oven and enjoy a comforting homemade meal with less fuss and plenty of delicious flavor.