Introduction
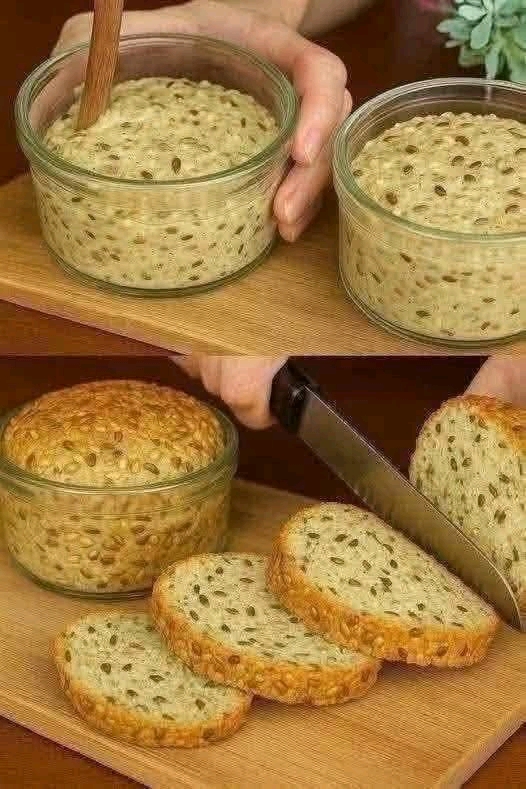
Imagine the aroma of freshly baked bread wafting through your home – that warm, comforting scent that instantly makes everything feel cozier. Now, imagine achieving that without the arm-aching work of kneading, and with a presentation so charming it’ll make you smile. Welcome to the world of Seeded No-Knead Bread, baked right in a glass bowl! This recipe is a game-changer for anyone who loves homemade bread but shies away from the traditional, labor-intensive methods. It’s all about simplicity meeting deliciousness, allowing time to do the heavy lifting while you go about your day.
What makes this particular no-knead bread so special? Firstly, its incredible ease and accessibility. You don’t need a stand mixer, a bread machine, or any specialized equipment beyond a mixing bowl and some oven-safe glass dishes. This makes it perfect for beginners taking their first steps into bread making, or for experienced bakers looking for a low-effort, high-reward recipe. Secondly, the visual appeal is undeniable. Baking in individual glass bowls yields uniquely shaped, perfectly portioned loaves that are not only adorable but also ensure a consistently crispy crust and tender crumb. Finally, the generous addition of various seeds doesn’t just add a delightful crunch and nutty flavor; it also boosts the nutritional profile, making each slice a little bit healthier and more satisfying. Get ready to impress yourself and your loved ones with a delightful loaf that looks as good as it tastes!
This detailed guide will walk you through every step, from mixing a shaggy dough to pulling golden-brown loaves from your oven. You’ll learn the secrets behind the no-knead method, understand why those glass bowls are more than just a pretty face, and discover how easy it is to customize this recipe to your heart’s content. Prepare to transform simple ingredients into a truly delightful loaf that will become a staple in your kitchen.
Nutritional Information
Per serving (approximate values – based on 10 servings per loaf):
Calories: 250
Protein: 9g
Carbohydrates: 45g
Fat: 4g
Fiber: 5g
Sodium: 350mg
Ingredients
3 cups (360g) all-purpose flour, plus extra for dusting
1/2 teaspoon instant or active dry yeast
1 1/2 teaspoons fine sea salt
1/4 cup (30g) mixed seeds (such as flax seeds, sunflower seeds, sesame seeds, poppy seeds, or pumpkin seeds), plus more for sprinkling
1 1/2 cups (360ml) lukewarm water (around 100-110°F / 38-43°C)
Olive oil or butter for greasing the glass bowls
Instructions
In a large mixing bowl, combine the flour, yeast, and salt. Whisk briefly to ensure they are well distributed.
Add the 1/4 cup of mixed seeds to the dry ingredients and stir to combine. This ensures the seeds are evenly dispersed throughout the dough.
Pour the lukewarm water into the dry ingredients. Using a wooden spoon or a sturdy spatula, mix until a shaggy, sticky dough forms. There’s no need to knead; just ensure all the flour is hydrated. The dough will look quite wet and uneven – this is perfectly normal for a no-knead dough.
Cover the bowl tightly with plastic wrap or a damp kitchen towel. Place the bowl in a warm, draft-free spot (like an oven with the light on, but turned off) and let it ferment at room temperature for at least 12 hours, and up to 18 hours. During this time, the dough will double in size, become bubbly, and develop a complex flavor.
After the long fermentation, generously grease two oven-safe glass bowls (approximately 1-quart / 1-liter capacity each) with olive oil or butter. Dust the greased bowls lightly with flour, tapping out any excess. This is crucial for preventing sticking.
Gently scrape the dough out of the bowl onto a lightly floured surface. Avoid deflating it too much. Using a bench scraper or floured hands, gently divide the dough in half.
Working with one half at a time, gently fold the edges of the dough towards the center a few times to form a rough ball. Try to create some surface tension. Do not knead aggressively.
Carefully transfer each dough ball into one of the prepared glass bowls. If desired, sprinkle a few extra seeds on top of each dough ball.
Loosely cover the glass bowls with plastic wrap or a damp towel and let them proof at room temperature for another 30-45 minutes. The dough should visibly puff up again.
While the dough is proofing, preheat your oven to 450°F (230°C). Make sure to place an oven rack in the lower-middle position.
Once the oven is preheated and the dough has proofed, carefully remove the plastic wrap from the glass bowls. Place the bowls directly into the preheated oven.
Bake for 30-35 minutes, or until the crust is deeply golden brown and sounds hollow when tapped on the bottom. The internal temperature should register around 200-210°F (93-99°C).
Carefully remove the glass bowls from the oven. Using oven mitts, immediately invert the bowls onto a wire cooling rack to release the bread. If the bread sticks, gently run a knife around the edges.
Allow the loaves to cool completely on the wire rack for at least 1-2 hours before slicing. Slicing warm bread can result in a gummy texture.
Cooking Tips and Variations
For the best results with this seeded no-knead bread, consider a few key tips. Always use oven-safe glass bowls, such as Pyrex or borosilicate glass, to prevent shattering. Avoid placing cold glass bowls directly into a hot oven or hot bowls onto a cold surface, as extreme temperature changes can cause them to break. Generously greasing and flouring your glass bowls is paramount; this ensures your beautiful loaves release easily without sticking. The high hydration of no-knead doughs is what creates their characteristic open, airy crumb, so resist the urge to add more flour during the initial mixing, even if it seems very sticky. The long fermentation time is not just for convenience; it’s essential for developing the complex flavors and the unique gluten structure that eliminates the need for kneading. If your kitchen is particularly cold, you can place the covered dough in a turned-off oven with just the light on to create a slightly warmer environment for fermentation. During the second proofing in the bowls, don’t let the dough over-proof, or it might collapse in the oven. Look for a visible puff, but not a massive expansion. For an even crispier crust, you can place a shallow pan of water on the bottom rack of your oven during baking to create steam. To enhance the flavor of your seeds, gently toast them in a dry skillet for a few minutes before adding them to the dough, being careful not to burn them. Another trick for a beautiful crust is to brush the tops of the loaves with a little water or milk just before baking, or even sprinkle with a few extra seeds for a rustic finish.